Odoo makes extensive use of filters to allow selection of records, as per this example in the CRM pipeline:

This article is about the type of Filter that is defined in a search view and is shown in the ‘Filters’ dropdown (blue box above with 9 filters) and also the “search” and “group by” functionality. Note that Odoo Studio makes it easy to add all of these, as explained here.
There are also User-defined filters under “Favourites” in the green box above, and in this example one has been setup (‘No customer’). More information here.
As explained above, the filters are defined in Search Views, so we need to start by enabling developer mode and navigate to Settings / Technical / Views
We know that this is a Search view so we can use the pre-defined filter:
- We also need to know which Model (database table):
- Maybe you already know that this is
crm.lead - If not, you can find it in the address bar:

- You could use the debug menu and check the Kanban View
- Maybe you already know that this is
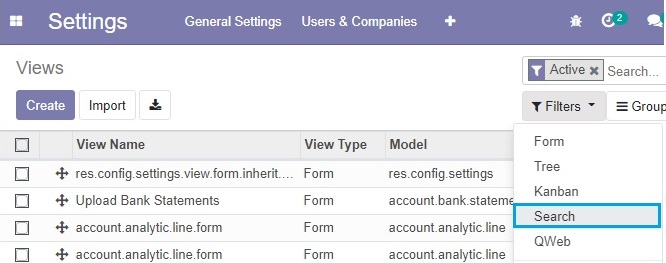
This is the list of views based on those filters:

- The first Search View is for Opportunities (which is what is shown in the Pipeline), so that is the one we need.
- The second one is for Leads
- The third one is for a report
If you aren’t sure which one to select, check them to see if they match what you can see in the ‘Filters’ dropdown.

It should be fairly clear that this does contain the same 9 filters that we can see above, so it’s the correct Search View. Let’s look at this in more detail.
Search filters
The first part of this Search View defines the fields that are available in the search bar:


- Name field with “Opportunity” as the description
- Partner field with “Customer” as the description
- Tags
- Sales Team
- Stage
- Country
- City
These filters don’t have a domain because they are used for searching based on whatever you enter (“abcd” in the above example).
However, they may have a filter_domain to specify which fields are searched.

Each line defines the fields that will be searched, so for example if you enter an email address in the search bar you can see all opportunities for that email address – which is quite useful. That’s because of this line in the XML:
('email_from', 'ilike', self) –> search on the email address on the Opportunity
Odoo will search all the specified fields, and remember that Opportunity is the default search because it’s the first one – if you want to search on another field (e.g. sales team or tag) you have to specify that.
Also, you can enter part of the email address (that works because of the ilike operator). Contact Name is a free-format text field that is shown on the “extra information” or “follow-up” tab and again you can enter any part of the name.
If there’s no filter_domain then the search will only check the name field.
Filters
The next section defines the filters


There are 12 filters defined, but 3 of them are invisible – and so there are 9 filters displayed:
- My Pipeline
- Unassigned
- Open Opportunities
- Unread Messages
- Creation Date
- Closed Date
- Won
- Lost
- Archived
Let’s take a look at the definition for the first filter:
My pipeline
<filter string="My Pipeline" name="assigned_to_me"
domain="[('user_id', '=', uid)]"
help="Opportunities that are assigned to me"
/>
- This starts with
filter - String is what is shown in the dropdown list (“My Pipeline”)
- Name is important because it allows this filter to be used elsewhere (e.g. in context for the Windows Action)
- Domain is where we define what is going to be selected (see below)
- Help text is optional
Domain
It’s important to understand the domain. In this example we are comparing the user ID on the record with the environment variable for the current user ID:
[('user_id', '=', uid)]
The second filter has a slightly different domain: [('user_id', '=', False)] to select Opportunities without a user assigned.
The third filter is to show “Open” opportunities:
[('probability', '<', 100), ('type', '=', 'opportunity')]
Odoo defines “open” as a percentage of less than 100% (because when it is set to ‘Won’ it becomes 100%).
There’s another filter for “Won” opportunities:
['&', ('active', '=', True), ('stage_id.is_won', '=', True)]
This is a little more complicated because it’s possible to configure which stages in CRM are used for opportunities that have been won, so the name is not hard-coded. This might seem a bit confusing because as standard there is a stage called “Won”, but you could create more stages with different names if that is appropriate.

So the domain checks for the is_won flag (boolean) on the stage for the opportunity. The field stage_id links the opportunity to the stage.
Invisible filters
As noted above, there are 3 filters defined in the Search View but not shown in the dropdown. These invisible filters are defined here so that they be used elsewhere. Here’s one example:
<filter invisible="1"‘
string="Late Activities"
name="activities_overdue"
domain="[('activity_ids.date_deadline', '<', context_today().strftime('%Y-%m-%d'))]"
help="Show all opportunities for which the next action date is before today"
/>
- This starts with
filter, but this time withinvisible="1" - String is the description
- Name will be used elsewhere
- Domain defines what is going to be selected (see below)
- Help text is optional
Domain
[('activity_ids.date_deadline', '<', context_today().strftime('%Y-%m-%d'))]"
activity_ids links crm.lead to activities [mail.activity] and the comparison is made with today’s date – in yymmdd format – so if any activity for this Lead is overdue then the filter will select the record.

This filter is used in the Kanban view (from the clock icon![]() ) and the “activities” widget
) and the “activities” widget

All three of the invisible filters are used in the same way.
Group By
The final section defines the ‘Group By’ options, which are used in Kanban and List Views

The syntax here is fairly simple. Note that you can limit these by user access group if you really want!
See also: Date Filters
